


Removing a lawn mower blade is a routine maintenance task that plays a major role in keeping your lawn healthy and your mower working efficiently. Whether you plan to sharpen a dull blade or replace a damaged one, knowing how to remove a lawn mower blade safely and correctly is essential for both performance and personal safety.
In this guide, you’ll learn the exact tools you need, the most important safety precautions, and the correct preparation steps before removing your mower blade. These instructions apply to most push lawn mowers, including gas-powered and electric models.
Tools & Equipment You’ll Need for Removing Blades
Before diving into the process of removing the lawn mower blade, it's crucial to gather the right tools and ensure you're taking the necessary safety precautions. Proper preparation will make the job easier, safer, and more efficient.
- Cut-resistant work gloves
- Safety glasses
- Socket wrench, breaker bar, or adjustable wrench
- Wooden block or blade-holding tool
- Torque wrench (for proper reinstallation)
- Penetrating oil (for rusty or stuck bolts)
- Clean rag or paper towels
Having all tools ready before you begin helps prevent interruptions and reduces the risk of injury.
Important Safety Precautions Before Removing Lawn Mower Blades
⚠️ Never attempt to remove a lawn mower blade without taking proper safety measures. The blade is sharp, heavy, and connected to powerful moving parts.
Before working on your mower, always follow these steps:
- Turn off the mower completely and allow it to cool
- Disconnect the spark plug wire on gas mowers
- Remove the battery on electric or robotic mowers
- Shut off the fuel valve or run the tank low
- Work on a flat, stable surface with good lighting
- Wear protective gloves to prevent cuts
- Keep children and pets away from the work area
Important: When tilting the mower, always keep the carburetor and air filter facing upward to prevent oil and fuel from leaking into the engine.
Step-by-Step Guide: Removing the Lawn Mower Blade
Now that you have all the tools and safety preparations in place, it’s time to get to work. Below is a detailed, step-by-step guide to safely and efficiently remove the lawn mower blade.
Step 1: Disconnect the Lawn Mower From Power
Safety is the most important consideration when working with machinery like a lawn mower. Before starting the blade removal process, ensure that the engine can’t accidentally turn on.
- For Gas Mowers: Disconnect the spark plug. This prevents any chance of the mower starting while you're working on it.
- For Battery-Powered Mowers: Remove the battery. This ensures that there is no electrical power running through the mower while you're working on it.
After disconnecting the power, make sure the mower is completely powered off and stable before continuing.
Step 2: Position the Mower Correctly
Gently tilt the mower onto its side so that the carburetor and air filter are facing upward. This positioning prevents engine oil or fuel from leaking into the air intake or combustion chamber. If your mower is heavy, ask for assistance to avoid back strain.
Step 3: Secure the Blade
Once the mower is powered down and safe to handle, you need to secure the blade so it doesn't move around while you work on it.
- Use a Wooden Block: Place a sturdy wooden block beneath the blade. This helps to keep the blade from rotating as you try to loosen the bolt. The block can also prevent the mower from tipping over when it’s on its side.
- C-Clamp (Optional): If you don't have a wooden block or if you find it difficult to keep the blade steady, a C-clamp can be used to secure the blade firmly in place.
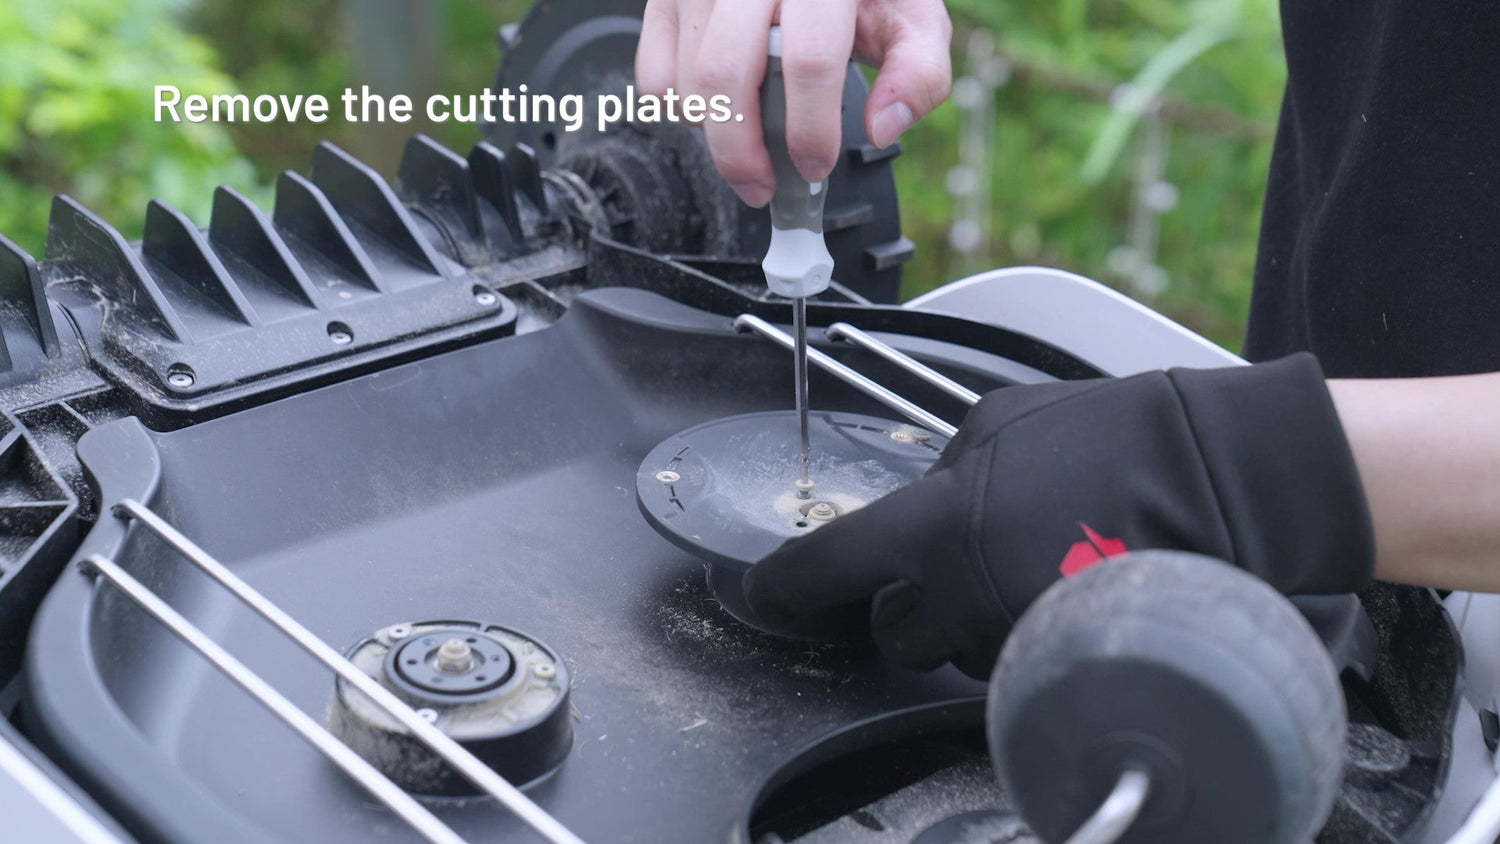
Step 4: Loosen the Bolt
Now it’s time to remove the bolt holding the blade in place. The direction in which you loosen the bolt will depend on the type of threads it has.
- Identify the Bolt Type:
Standard Thread: For most mowers, the bolt will follow the typical “righty-tighty, lefty-loosey” rule. Turn the bolt to the left (counterclockwise) to loosen it.
Reverse Thread: Some mowers use reverse-threaded bolts, where you turn the bolt to the right (clockwise) to loosen it. Be sure to check your mower’s user manual to confirm whether your mower uses standard or reverse threading.
- Loosen the Bolt:
Use a socket wrench or wrench to turn the bolt. Apply firm pressure to loosen it. If the bolt is too tight or rusted, consider using a penetrating lubricant (like WD-40) to help break the rust and make the process smoother.
Once the bolt starts to loosen, carefully continue turning it until it’s completely removed.
Step 5: Remove the Blade
With the bolt removed, the blade should now be free to come off. Gently lift the blade from its position, being careful not to damage any other components around it.
- Check the Blade: While removing the blade, take a moment to inspect it for signs of wear or damage. If the blade is cracked, severely worn, or has any other defects, it’s a good idea to replace it rather than trying to sharpen it.
- Handle the Blade with Care: The mower blade can be extremely sharp, so make sure to handle it carefully. Always use work gloves to protect your hands while removing the blade.
By following these four simple steps, you’ll have successfully removed the lawn mower blade. Make sure to keep the bolt and other components in a safe place, as you’ll need them when reinstalling the blade later.
Cleaning and Maintenance Tips Before Reassembly
Before you reinstall the lawn mower blade, it's a great time to clean the mower and inspect both the blade and the mower’s components. A little maintenance now can go a long way in keeping your mower running efficiently and extending its lifespan.
1. Cleaning the Mower Deck
After removing the blade, it’s important to clean the underside of the mower deck. Grass clippings, dirt, and debris can build up over time, blocking airflow and affecting the mower’s performance. Here's how to do it:
Remove Grass and Debris: Use a brush or a putty knife to scrape away any accumulated grass clippings, dirt, or other debris from the underside of the deck. This will prevent the build-up from affecting your mower's airflow and cutting efficiency.
Use Water (Optional): If there's stubborn debris, you can use a hose to spray down the mower deck, but make sure to dry the deck thoroughly afterward to prevent rust.
Apply Silicone Spray (Optional): If you have silicone spray or a similar lubricant, apply a light coat to the underside of the mower deck. This can help prevent future grass buildup and make it easier to clean after each mowing session.
2. Inspecting the Blade
Before you reinstall the blade, carefully inspect it for any damage that could affect its performance.
Check for Cracks: If the blade has visible cracks, chips, or bends, it's time to replace it. A damaged blade will not only perform poorly but can also pose a safety risk.
Examine the Cutting Edge: Look closely at the blade’s cutting edges. If they’re dull or chipped, it may be time to sharpen them. If you’re unsure about the blade's condition, it’s always safer to replace it rather than risk damage to your lawn or mower.
Inspect the Blade for Balance: A lawn mower blade must be balanced to ensure smooth operation. You can check the blade's balance by hanging it on a nail or using a blade balancing tool. If one side is heavier, file it down slightly to restore balance.
3. Additional Component Check
While you’re at it, take a moment to inspect other parts of your mower, such as:
Belt and Pulleys: Ensure that the mower's drive belt and pulleys are in good condition. A damaged belt can reduce performance or cause other issues.
Spark Plug: Check the spark plug for wear and replace it if necessary.
Oil and Fuel Levels: For gas-powered mowers, check the oil and fuel levels. Regular oil changes and fresh fuel will keep your mower running smoothly.

How to Reinstall the Lawn Mower Blade Correctly
After cleaning the mower and inspecting the blade, it’s time to reinstall the blade and make sure it’s properly aligned and securely fastened for optimal performance. Here’s how to complete the process:
Step 1: Align the Blade Properly
Proper alignment of the lawn mower blade is crucial for its efficient operation. Follow these steps to ensure the blade is mounted in the correct orientation:
- Blade Orientation: Most lawn mower blades will have a marking such as “grass side” or “this side up.” Ensure that the cutting edge of the blade faces the direction of rotation as indicated by these markings. The winged edges of the blade should point upwards toward the mower deck, not downwards.
- Check the Cutting Edge: The sharp edges of the blade should face downward, toward the grass. Double-check to ensure the blade is oriented in the right direction for proper cutting.
- Positioning the Blade: Place the blade onto the spindle or shaft of the mower deck, making sure it is aligned with the bolt holes. If there is a washer included, make sure it fits properly, with the concave side facing the blade.
Step 2: Tighten the Bolt Securely
Once the blade is properly positioned, it’s time to fasten it securely. Follow these steps:
- Insert the Bolt: Place the bolt through the hole in the blade and the spindle or shaft, making sure it goes in straight. If the bolt includes a washer, place it over the bolt before inserting it.
- Tighten the Bolt: Use your socket wrench or combination wrench to tighten the bolt securely. This step is crucial, as a loose blade can be dangerous and cause your mower to operate inefficiently. Ensure that the blade is tight and doesn’t wobble.
- Use a Torque Wrench (Optional): If your mower's manual recommends a specific torque value, use a torque wrench to tighten the bolt to the manufacturer’s specifications. Over-tightening can crack the blade, while under-tightening can cause the blade to loosen during use.
- Recheck for Stability: After tightening, give the blade a gentle shake to ensure that it’s securely in place. It should not wobble or move at all.
Step 3: Check for Proper Rotation
After the blade is securely fastened, check that it rotates smoothly and freely. You can do this by manually turning the blade by hand (if the mower is not electric). The blade should rotate without obstruction or resistance, indicating that it’s installed correctly.
Common Mistakes to Avoid When Removing Blades
When removing and reinstalling a lawn mower blade, it's important to be mindful of common mistakes that can compromise the safety, performance, and longevity of your mower. Here are some mistakes to avoid during the process:
1. Ignoring Safety Precautions
One of the biggest risks when working with a lawn mower blade is neglecting safety precautions. Here are some key safety tips:
- Not Disconnecting Power: Before starting, always disconnect the spark plug on gas mowers or remove the battery from electric mowers. This ensures that the mower won’t accidentally start while you're working on it.
- Not Wearing Protective Gear: Always wear heavy-duty gloves to protect your hands from the sharp edges of the blade. It's also recommended to wear safety goggles to protect your eyes from debris.
- Improper Handling of Gasoline: If you're working with a gas-powered mower, make sure to drain the gas or use a turkey baster to transfer the fuel to a container. This helps prevent spills when tipping the mower over.
2. Installing the Blade in the Wrong Direction
One of the most common errors is installing the blade upside down or backward. This can lead to poor cutting performance, damage to the lawn, and even strain on the mower’s motor.
- Check Blade Orientation: Always double-check the blade orientation before securing it in place. The “grass side” or “this side up” markings should face outward, and the cutting edge should always face downward.
- Proper Alignment: Ensure that the blade is aligned correctly with the mower’s spindle. Misalignment can lead to an uneven cut and even cause the blade to wobble or come loose.
3. Over-tightening or Under-tightening the Bolt
The bolt that secures the blade is essential for stability and safety. Tightening the bolt incorrectly can cause damage to both the blade and the mower.
- Over-tightening: Tightening the bolt too much can lead to cracking the blade, or damaging the spindle or deck. Always refer to the manufacturer’s specifications for the proper torque settings.
- Under-tightening: A bolt that’s not tight enough can cause the blade to loosen or even fall off during operation. This could lead to dangerous situations, including serious injury. Make sure the blade is fastened securely but without over-tightening.
4. Failing to Clean the Mower Deck
Before reinstalling the blade, it’s important to clean the underside of the mower deck. Grass clippings and debris can accumulate over time, obstructing airflow and reducing cutting efficiency.
- Remove Grass and Dirt: Take a few minutes to clean the mower deck before reassembling. Use a brush to remove any buildup of grass and dirt from the deck and blade area.
- Prevent Build-up: Consider applying a light coating of silicone spray to the underside of the deck to prevent grass from sticking and reduce future buildup. This can improve airflow and help the mower perform more efficiently.
5. Not Inspecting the Blade
Before reinstalling the blade, take a moment to inspect it for damage, cracks, or excessive wear. A damaged blade can cause uneven cuts and even break during operation.
- Check for Cracks: If the blade is cracked or severely worn, it’s best to replace it rather than sharpen it. Continuing to use a damaged blade can be dangerous.
- Sharpening Over Replacement: While sharpening your blade can improve its performance, if it’s too worn down, it may be more effective to replace the blade entirely.
Final Thoughts
Removing and replacing a lawn mower blade might seem like a daunting task, but with the right tools, preparation, and careful attention to detail, you can do it yourself and keep your mower in top working condition. Regularly inspecting and maintaining your mower’s blade not only ensures clean cuts and a healthy lawn but also prolongs the life of your mower.
Take the time to check your blade at least once a season, and follow the steps outlined in this guide for a safe and successful DIY mower blade removal and installation. You can save money by avoiding professional services, while also gaining a sense of satisfaction from taking care of your lawn mower yourself.
If you have any other tips or experiences, feel free to share them in the comments. And don’t forget to subscribe to our newsletter for more helpful maintenance guides and lawn care tips!


