


Spring is the ideal time to breathe life back into your lawn and ensure it thrives throughout the warmer months. To achieve a lush, vibrant lawn, it's crucial to start with proper spring lawn care. In this comprehensive guide, we'll cover essential spring lawn care tasks, including cleaning, aeration, fertilization, overseeding, weed control, and mowing. Let's get started!
1. Clean Up the Lawn for a Fresh Start
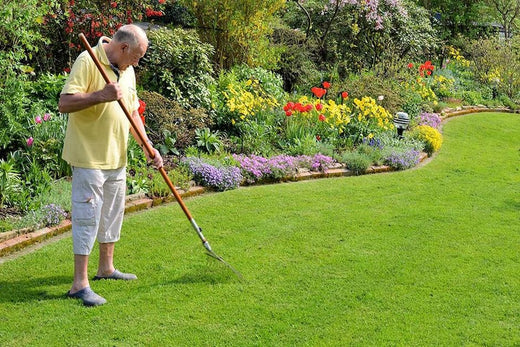
Before your lawn can thrive this spring, it’s essential to give it a fresh start. Winter can leave behind debris, compacted soil, and damage that can hinder grass growth. Taking the time to clean up and prepare your lawn now sets the stage for lush, healthy grass later in the season.
Why It’s Important
Cleaning up your lawn not only enhances its appearance but also prevents problems like fungal diseases, uneven growth, and blocked sunlight. A clean lawn allows nutrients, water, and sunlight to reach the soil and roots without obstruction, promoting healthier grass.
Steps to Follow:
- Remove Debris: Begin by using a rake to clear away any leaves, twigs, and other debris that have accumulated during winter. Pay special attention to areas where thick layers of leaves or compacted snow residue are present, as they can encourage mold growth or suffocate the grass.
- Inspect for Damage: Look for signs of snow mold, a common winter lawn disease that appears as discolored, matted patches of grass. Check for bare spots or thinning grass caused by harsh winter weather or heavy foot traffic. Identifying and addressing damage early can help prevent long-term issues.
- Address Drainage Issues: If you notice areas where water pools after rain or melting snow, it may indicate drainage issues. Aeration can help alleviate compaction, but you may also need to fill in low spots or improve soil composition to ensure proper drainage and healthy root development.
- Light Raking for Thatch Control: A thin layer of thatch (organic matter between the grass and soil) is normal and beneficial for your lawn. However, excessive thatch can block water and nutrients from reaching the roots. Light raking at this stage helps keep thatch in check. Be gentle to avoid disturbing the delicate grass that's just beginning to grow.
- Dispose of Debris Properly: Whenever possible, compost organic material like leaves and grass clippings to reduce waste. Otherwise, follow local yard waste disposal guidelines to ensure proper handling of debris.
Pro Tip:
If your lawn feels spongy underfoot or shows excessive thatch buildup, it may need deeper de-thatching or aeration, which we’ll cover in later sections.
2. Assessing Your Lawn Health
A healthy lawn is the foundation of a beautiful garden. If your lawn feels spongy underfoot or shows signs of excessive thatch buildup, it might need deeper de-thatching or aeration, which we will cover in later sections.
How to Evaluate Your Lawn's Healthy:
- Examine Grass Color and Coverage: A healthy lawn should have a uniform, vibrant green color. Look for areas where the grass appears yellow, brown, or sparse. These signs may indicate nutrient deficiencies, compacted soil, or disease. Identifying these issues early allows you to take corrective action before they worsen.
-
Identify Problem Areas:
- Bare Spots: These are often caused by heavy foot traffic, pests, or poor drainage.
- Thinning Grass: This could be a result of winter stress, competition with weeds, or insufficient sunlight.
- Test Your Soil: To ensure your lawn is getting the nutrients it needs, use a soil test kit (available at garden centers or through your local agricultural extension office). The test will measure pH levels and nutrient content.
Grass thrives in slightly acidic soil with a pH between 6.0 and 7.0. If your soil is too acidic or alkaline, soil amendments like lime or sulfur can help balance it. Make sure to check for nutrient deficiencies, particularly nitrogen, phosphorus, and potassium, which are crucial for spring growth.
- Inspect for Pests or Diseases: Common lawn pests in spring include grubs and chinch bugs. Damage from pests typically appears as irregular brown patches. Additionally, diseases like snow mold or brown patches can cause discoloration or weak areas in the lawn.
Why This Matters
Diagnosing your lawn’s health early on can save you time and effort in the long run. For example:
- Fertilizing without addressing soil pH imbalances may not provide the expected benefits.
- Seeding without fixing underlying issues, such as pests or poor drainage, can lead to wasted time and resources, as the grass won’t grow effectively.
Pro Tip:
If your soil test reveals deficiencies, consider applying a starter fertilizer or soil amendment before tackling tasks like overseeding or aerating. This will give your lawn the best possible foundation for growth and ensure the success of the following care steps.
3. Aerating and De-Thatching (Optional)
Not every lawn requires aeration or de-thatching in the spring, but if your lawn does, these tasks can dramatically improve its health and appearance. Knowing when and how to perform these treatments will ensure your lawn gets the oxygen, water, and nutrients it needs to thrive.
Why Aerate Your Lawn?
Over time, soil becomes compacted, especially in high-traffic areas. Compacted soil prevents grass roots from accessing essential nutrients, water, and air, leading to weak growth and poor health. Aeration involves perforating the soil with small holes, which alleviates compaction and improves root access to essential resources, promoting a healthier lawn.
When to Aerate:
- Heavy foot traffic or machinery use: Lawns in high-traffic areas tend to compact more quickly and may benefit from aeration.
- Pooling water: If water pools on the surface instead of soaking into the soil, it could be a sign of compaction.
-
Soil test reveals high clay content: Clay soil is more prone to compaction, making aeration essential.
Steps for Aerating
- Choose the right aerator: A core aerator (which removes small soil plugs) is more effective than spike aerators.
- Aerate at the right time: For cool-season grasses, aerate during early to mid-spring. For warm-season grasses, late spring is the best time.
- Cover the entire lawn evenly: Make sure to focus on compacted areas, but aim for overall coverage.
-
Leave the plugs on the lawn: These soil plugs decompose and return valuable nutrients to the soil.
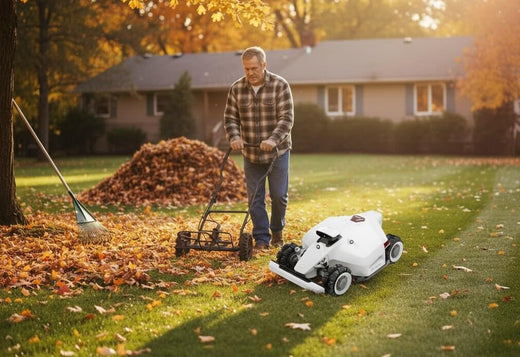
Why De-Thatch Your Lawn?
Thatch is a layer of dead grass, roots, and organic matter that accumulates between the soil and the grass blades. A small amount of thatch (less than ½ inch thick) is beneficial, but too much can block water, air, and nutrients from reaching the roots, resulting in a weak lawn.
Signs Your Lawn Needs De-Thatching:
- Spongy underfoot: If your lawn feels spongy, it could indicate excessive thatch buildup.
- Thin or struggling grass: Grass that appears thin or doesn’t grow well despite proper watering and fertilizing may have a thatch problem.
-
Thatch layer exceeds ½ inch: Measure the thatch layer with a ruler—if it’s thicker than ½ inch, it’s time to de-thatch.
Steps for De-Thatching:
- Use the right tools: A de-thatching rake or power rake is suitable depending on the size of your lawn and the severity of the thatch.
- Rake in multiple directions: Rake in several directions to loosen and remove excess thatch from the lawn.
- Collect and dispose of debris: After raking, collect the excess thatch and dispose of it. Follow up by watering and fertilizing the lawn to help it recover.
Pro Tips:
If your lawn requires both aeration and de-thatching, perform de-thatching first. This will clear the way for aeration to be more effective, allowing the lawn to receive better airflow, water, and nutrients.
4. Fertilizing Your Lawn for Healthy Growth

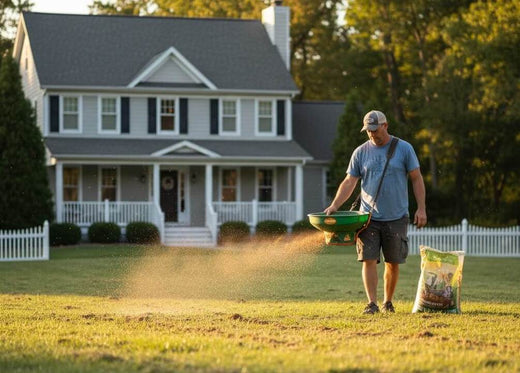
Fertilizing your lawn in the spring is like giving it a balanced breakfast to kick off the day. Proper fertilization provides essential nutrients to your grass, helping it recover from winter and prepare for the growing season. However, timing and technique are crucial—too much fertilizer or improper application can cause more harm than good.
Why Fertilize in Spring?
Grass needs three key nutrients—nitrogen, phosphorus, and potassium (NPK)—to grow thick and healthy. Fertilizing in spring replenishes the nutrients lost over the winter and promotes strong root development. This helps your lawn outcompete weeds and resist diseases, setting the stage for lush, green grass all season.
Choosing the Right Fertilizer:
Not all fertilizers are the same. When selecting a fertilizer, it's important to consider:
- Grass Type: Different grass species have different nutrient needs. For example, cool-season grasses like Kentucky bluegrass benefit from high-nitrogen fertilizers, while warm-season grasses like Bermuda grass need balanced fertilizers.
- Slow-Release vs. Quick-Release: Slow-release fertilizers provide nutrients gradually, reducing the risk of nutrient leaching and ensuring a steady supply throughout the growing season. Quick-release fertilizers offer immediate results but require more frequent applications.
- NPK Ratio: The NPK ratio (Nitrogen, Phosphorus, Potassium) indicates the proportions of key nutrients in the fertilizer. Nitrogen encourages leaf growth, phosphorus supports root development, and potassium helps the lawn tolerate stress.
How to Apply Fertilizer:
- When to Apply: Apply fertilizer early in the spring when the grass is actively growing but not yet stressed by high temperatures.
- How Much to Apply: Follow the instructions on the fertilizer package to avoid over-fertilizing, which can harm the lawn and the environment.
- Apply Evenly: Use a broadcast spreader to distribute the fertilizer evenly across the lawn. Be sure to cover the entire lawn without overlapping too much.
-
Water After Fertilizing: Watering your lawn after fertilizing helps the nutrients soak into the soil, ensuring they reach the roots.
Common Fertilization Mistakes to Avoid:
- Over-fertilizing: Too much nitrogen can cause “burn” and encourage shallow root growth, weakening the lawn in the long term.
- Fertilizing too early: Applying fertilizer before the soil has warmed up can be wasteful, as the grass won’t be able to absorb it properly.
- Ignoring soil health: Fertilizer is most effective when the soil is in good condition, with balanced pH levels and proper aeration.
Pro Tip:
If your lawn has a history of nutrient imbalances, consider conducting a soil test to ensure you apply the right type and amount of fertilizer. This can also help avoid excess fertilizer, which can lead to nutrient runoff and environmental damage.
5. Seeding and Repairing Bare Spots
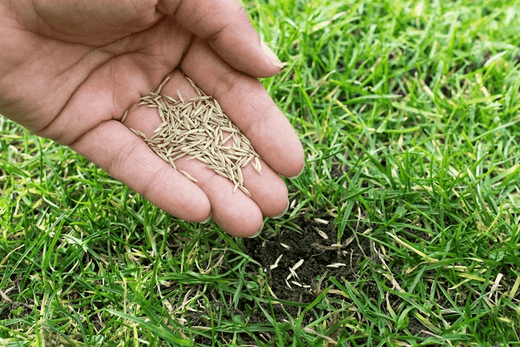
Spring is the ideal time to repair any damaged or bare spots in your lawn. Whether caused by winter stress, pests, or heavy foot traffic, addressing these areas early helps create a uniform, healthy lawn. By adding the right seed and following proper care techniques, you can fill in those gaps and ensure the grass grows back strong and healthy.
When to Seed:
The best time to seed depends on the type of grass you have:
- Cool-season grasses (e.g., Kentucky bluegrass, fescue): Best seeded in early to mid-spring, when soil temperatures are between 50°F and 65°F (10°C to 18°C).
- Warm-season grasses (e.g., Bermuda, zoysia): Seed in late spring or early summer, when temperatures are consistently above 65°F (18°C).
Choosing the Right Seed:
1. Match Grass Seed to Your Climate
- If you live in the northern U.S., focus on cool-season grasses, as they thrive in cooler climates.
- For the southern U.S., warm-season grasses are more appropriate due to the heat and longer growing seasons.
2. Select Quality Seed
- Look for seed that is certified as weed-free and tailored for your specific grass type. High-quality seed ensures a better germination rate and healthier growth.
How to Seed Bare Spots
-
Prepare the Soil
- Rake the soil lightly to loosen it and create a good seedbed. For larger bare spots, use a garden hoe or shovel to break up compacted soil.
- If the area has poor drainage, improve the soil by adding compost or sand to enhance structure and water retention.
-
Apply Seed
- Use a broadcast spreader to apply the seed evenly, or hand-sow the seed for smaller areas. Aim for about 3-4 pounds of seed per 1,000 square feet.
- Gently press the seed into the soil by raking again or using a roller to ensure good seed-to-soil contact.
-
Water Regularly
- Keep the seeded area consistently moist but not soggy until the seeds germinate and establish roots.
- Water lightly every day until grass blades emerge. Once the grass is established, reduce watering to a more standard schedule.
How to Help New Seed Grow:
1. Fertilize Lightly
- After seeding, apply a balanced, slow-release fertilizer to provide a steady supply of nutrients. Avoid high-nitrogen fertilizers, which may encourage weed growth instead of healthy grass.
2. Avoid Heavy Foot Traffic
- Try to keep people and pets off newly seeded areas to prevent soil compaction and ensure the grass grows unhindered.
Pro Tip:
For larger bare patches or stubborn areas that don’t seem to fill in, consider using a lawn repair mix. These mixes combine seed, mulch, and sometimes fertilizer in one product, making it easier to establish new grass.
6. Weed Control
Weeds are a common challenge in spring, competing with your grass for water, nutrients, and sunlight. Early weed control is essential to prevent weeds from becoming entrenched in your lawn and taking over. By taking the right steps now, you can enjoy a healthier, more vibrant lawn throughout the growing season.
Spring Weed Challenges:
Spring is the prime time for certain weeds, particularly cool-season weeds like dandelions, crabgrass, and chickweed, which begin to emerge as the weather warms. These weeds can quickly crowd out grass and make your lawn look patchy and unhealthy.
Preventing Weeds Before They Appear:
1. Pre-Emergent Herbicides
- Pre-emergent herbicides are applied early in the spring to prevent weed seeds from germinating. They create a barrier in the soil that stops new weeds from sprouting.
- Timing is crucial: Apply pre-emergent herbicides when soil temperatures reach about 55°F (13°C) for several consecutive days. This usually happens in early to mid-spring for cool-season lawns.
- Be sure to check the label to ensure the product targets the weeds in your region.
2. Mulching Bare Spots
- If you’re overseeding or repairing bare spots, consider using mulch to help retain moisture and suppress weed growth. Organic mulches, such as straw or shredded leaves, can also prevent weed seeds from taking root.
Dealing with Existing Weeds:
1. Spot Treat with Herbicides
- If weeds are already visible, spot-treat them with a selective herbicide. Make sure to use a herbicide that’s safe for your grass type. For instance, a broadleaf herbicide can effectively target weeds like dandelions without harming your grass.
- Apply herbicides on a dry day with no rain in the forecast for at least 24 hours to ensure the product is absorbed properly.
2. Manual Weed Removal
- For a more natural approach, manually remove weeds using a weeding tool or by hand. This is particularly effective for weeds like dandelions with deep taproots.
- Make sure to remove the entire root to prevent the weed from regrowing.
3. Maintain Proper Mowing Heights
- Healthy, well-maintained grass is better equipped to compete with weeds. Keeping your grass at the right height—usually about 2.5 to 4 inches—shades the soil and discourages weed growth.
Pro Tip:
If you’re using a pre-emergent herbicide, be cautious about reseeding your lawn immediately afterward, as these products may also prevent your grass seed from germinating. Always follow the instructions on the product label regarding re-seeding times.
7. Essential Lawn Care Tips for Spring
Once you've completed the major tasks of cleaning, assessing, fertilizing, seeding, and controlling weeds, it’s time to fine-tune your lawn care routine to ensure long-term success. By implementing a few additional tips, you can further improve your lawn’s health and appearance, helping it thrive throughout the entire growing season.
1. Mowing Tips: Set the Right Height
Mowing is a simple but essential part of maintaining a healthy lawn, and how you mow can make a significant difference. Cutting your grass too short can stress the lawn and make it more susceptible to pests and diseases.
- For Cool-Season Grasses: Mow at a height of 2.5 to 4 inches. This allows the grass to shade the soil, preventing weeds from germinating and encouraging strong root development.
- For Warm-Season Grasses: Mow at a slightly lower height of 1.5 to 2.5 inches, depending on the variety.
- Mow When Dry: Try to mow when your lawn is dry to avoid clumping and uneven cuts. Mowing in the morning when the grass is dew-covered can lead to a messy finish.
2. Watering Best Practices: Deep vs. Shallow Watering
Proper watering is critical to lawn health. While it’s important to give your lawn enough moisture, overwatering or frequent shallow watering can lead to weak root systems and encourage shallow-rooted weeds like crabgrass.
- Deep Watering: Water deeply but infrequently. Aim for 1 to 1.5 inches of water per week (including rainfall). Deep watering encourages roots to grow down into the soil, making the grass more drought-tolerant and resilient.
- Water Early in the Morning: Early morning watering ensures the grass dries before evening, reducing the risk of fungal diseases. Avoid watering in the heat of the day, as water will evaporate too quickly.
- Avoid Overwatering: Too much water can lead to shallow root growth, fungal issues, and thatch build-up. Check the soil moisture by pushing a screwdriver into the ground; it should penetrate easily if the soil is adequately hydrated.
3. Avoid Common Spring Lawn Mistakes
- Don’t Mow Too Short: Cutting your grass too short weakens the plant, leading to poor growth and increased weed competition. Follow the recommended mowing height for your grass type.
- Be Mindful of Pests and Disease: As temperatures rise, pests like grubs and insects may become more active. Keep an eye out for patches of brown grass or signs of damage. Early treatment can prevent problems from worsening.
- Don’t Fertilize Too Early: Applying fertilizer too early, especially when the ground is still cool, can encourage weeds rather than promoting healthy grass growth. Wait until the grass starts actively growing.
4. Regularly Inspect Your Lawn
- Walk your lawn regularly and inspect for any new problems like pests, diseases, or dry spots. Early detection is key to preventing damage.
- Look for areas where water is pooling or draining poorly, as this can signal an underlying drainage issue that needs attention.
Conclusion: Your Spring Lawn Care Success
With these essential spring lawn care steps, you're on your way to achieving a lush, healthy, and vibrant lawn that will thrive throughout the growing season. By preparing your lawn properly, addressing key issues early, and staying consistent with maintenance, you’ll create a strong foundation for your grass to flourish.
Remember, the key to a great lawn is a combination of patience, knowledge, and timing. Whether you're seeding bare spots, controlling weeds, or simply mowing with care, every step contributes to a lawn that not only looks good but also improves the overall health of your landscape.
By taking the time to address these early spring tasks, you'll set your lawn up for success all season long. Consistent care will help it withstand the summer heat, resist pests, and thrive, ensuring your lawn remains a beautiful, green space to enjoy with family and friends.
So, roll up your sleeves, get started, and enjoy the satisfaction of a lawn that’s the envy of your neighborhood!
Frequently Asked Questions
1. What should I do to my lawn in the spring?
In the spring, your lawn requires cleaning up debris like dead grass, leaves, and twigs. This helps the grass breathe and creates space for new growth. Additionally, it's a great time to aerate the soil to improve root development.
2. What is the best lawn treatment in spring?
The best lawn treatments in spring include:
- Weed Control: Remove weeds to prevent them from competing with your grass for nutrients and water.
- Fertilization: Use a balanced fertilizer rich in nitrogen, phosphorus, and potassium to support healthy grass growth.
- Aeration: Aerate your lawn to enhance soil drainage and promote healthy root systems.
3. How do I level my lawn in the spring?
Assess and Rake: Identify low spots and clear debris.
Aerate: Use a lawn aerator to create holes for better soil penetration.
Prepare Leveling Mix: Combine topsoil, compost, and sand.
Fill Low Spots: Spread the mix over low areas, ensuring a thin layer.
Smooth and Water: Use a rake or board to smooth the surface and water lightly.
Fertilize and Seed: Fertilize and reseed bare spots if needed.
4. Should you rake dead grass in spring?
Yes, raking dead grass, leaves, and other debris is essential in the spring. It helps prevent the buildup of thatch, which can block water and nutrients from reaching the soil. It also prevents mold and pest problems.
5. When to start yard work in spring?
Start yard work in early spring as soon as the weather allows. This includes cleaning up debris, trimming bushes, and preparing your lawn for aeration and fertilization.
6. When should I do spring yard clean up?
Spring yard cleanup should ideally be done in early spring, right when the weather is mild, and before new growth starts to emerge. This will ensure that your lawn is free from old leaves and debris that could hinder its growth.
7. In what order should I treat my lawn?
The order of spring lawn care should be:
- Clean-up: Remove debris and dead grass.
- Aeration: Break up compacted soil.
- Fertilization: Add nutrients to your lawn.
- Seeding: If needed, reseed bare spots.
- Weed Control: Apply weed control products as necessary.
8. When should you not mow your lawn?
You should avoid mowing your lawn when it’s too wet, as this can cause damage to both the grass and the mower. Also, avoid mowing during extreme heat to prevent stress on the grass.
9. When to fertilize a lawn in spring?
Fertilize your lawn in early spring, typically when your grass starts growing, around late March or early April. This is when grass needs nutrients to start the growing season strong.
10. What month should I start cutting grass?
Start cutting grass in spring once it reaches about 3 inches tall. This can vary depending on your location, but generally, it's around April or May when you can begin mowing regularly.


